“Welcome to the World of DIY Spring Manicure with Floral Patterns
Welcome to the World of DIY Spring Manicure with Floral Patterns
As the weather starts to warm up and the flowers begin to bloom, it’s the perfect time to give your nails a fresh new look. A DIY spring manicure with floral patterns is a great way to add some color and personality to your nails, and with the right tools and techniques, you can achieve a salon-quality finish from the comfort of your own home.
In this article, we’ll guide you through the steps to create a beautiful DIY spring manicure with floral patterns. From preparing your nails to adding the final touches, we’ll cover everything you need to know to get started.
Preparing Your Nails
Before you start your DIY spring manicure, it’s essential to prepare your nails. This includes removing any old nail polish, pushing back your cuticles, and shaping your nails to your desired shape.
To remove old nail polish, use a nail polish remover and cotton balls or pads. Gently rub the remover onto your nails, making sure to remove all of the old polish. Once you’ve removed the old polish, wash your hands with soap and water to remove any remaining residue.
Next, push back your cuticles using a cuticle pusher or an orange stick. Be careful not to push too hard, as this can cause bleeding or pain. Simply gently push back the cuticles, making sure to remove any dead skin.
Finally, shape your nails to your desired shape using nail clippers or a nail file. Make sure to file your nails in one direction only, as filing back and forth can cause damage to the nail.
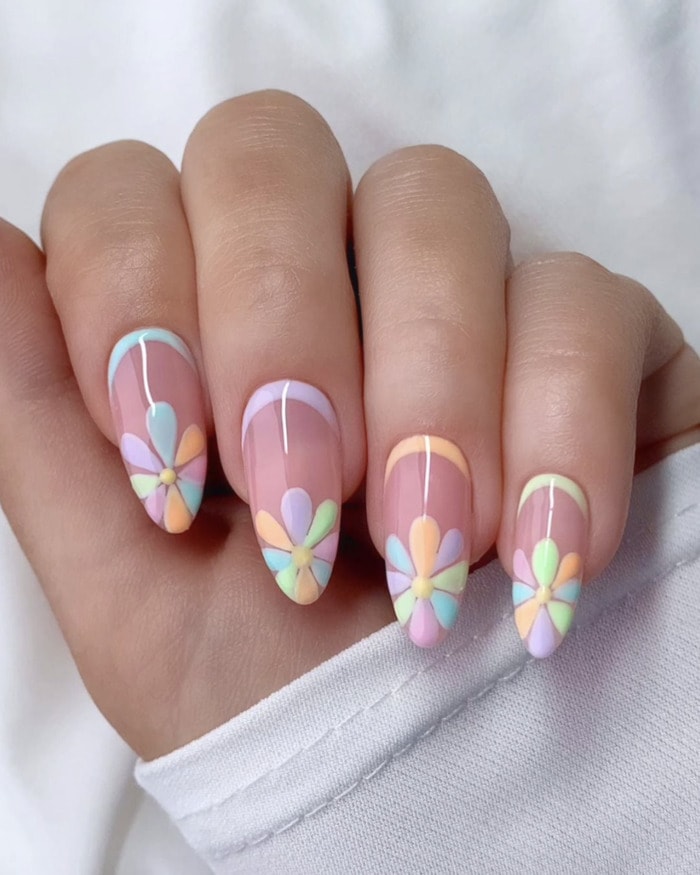
Choosing Your Colors
When it comes to a DIY spring manicure with floral patterns, the colors you choose are crucial. For a spring-inspired look, consider using pastel shades such as pale pink, baby blue, or yellow. You can also add some white or cream accents to give your nails a fresh and clean look.
If you want to add some extra color to your nails, consider using a bold shade such as coral or mint. These colors are perfect for spring and can add a fun and playful touch to your manicure.
Applying the Base Coat
Once you’ve prepared your nails and chosen your colors, it’s time to start applying the polish. Begin by applying a clear base coat to each of your nails. This will help to protect your nails and prevent staining.
To apply the base coat, simply brush it onto each of your nails, making sure to cover the entire nail surface. Make sure to let the base coat dry completely before moving on to the next step.
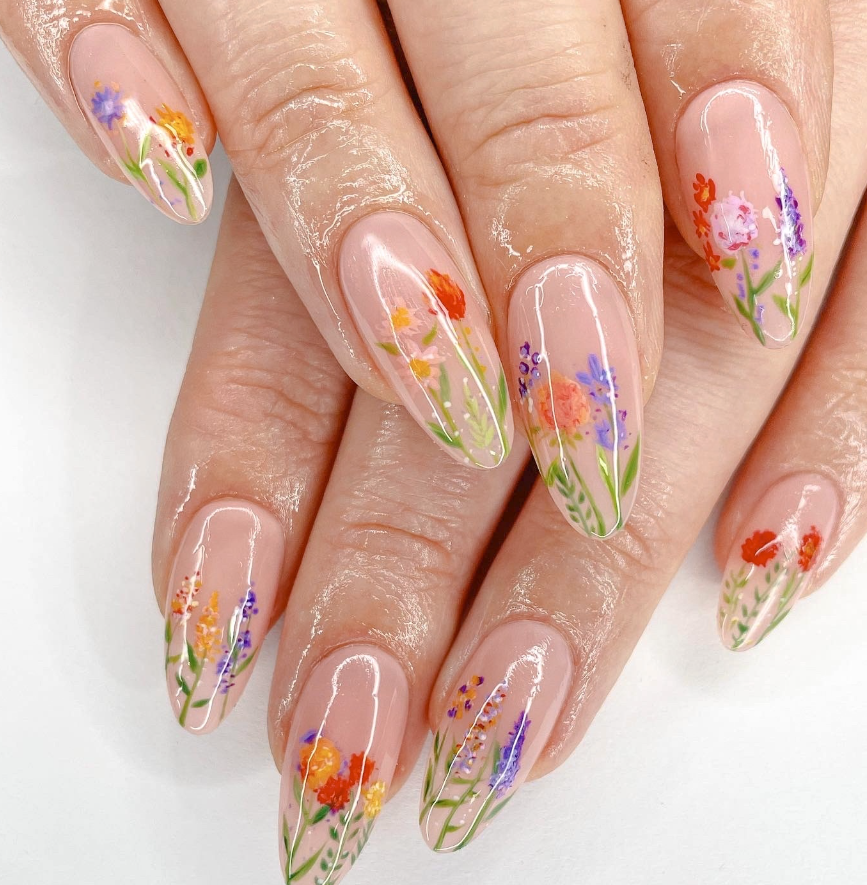
Creating the Floral Pattern
Now it’s time to create the floral pattern. To do this, you’ll need a few different tools, including a nail art brush, a dotting tool, and a nail stamp.

Start by painting a small flower onto each of your nails using the nail art brush. You can use a pale pink or yellow polish for the flower, and add some white or cream accents to give it a more realistic look.
Once you’ve painted the flower, use the dotting tool to add some details to the center of the flower. You can use a small dot of white or yellow polish to create the center of the flower.
Next, use the nail stamp to add some leaves to the floral pattern. Simply place the stamp onto your nail and press down gently to transfer the design.
Adding Additional Details
Once you’ve created the floral pattern, you can add some additional details to give your nails a more polished look. Consider adding some white or cream accents to the flower, or using a small dot of glitter polish to add some extra sparkle.

You can also use a nail art brush to paint on some additional details, such as stems or leaves. Simply use a small brush to paint on the details, making sure to keep the lines steady and smooth.
Finishing with a Top Coat
Finally, finish your DIY spring manicure with a clear top coat. This will help to seal in the polish and add a glossy finish to your nails.
To apply the top coat, simply brush it onto each of your nails, making sure to cover the entire nail surface. Make sure to let the top coat dry completely before handling your nails.
Tips and Tricks
Here are a few tips and tricks to help you achieve a salon-quality DIY spring manicure with floral patterns:
- Use a nail art brush to paint on small details, such as the center of the flower or the stems.
- Use a dotting tool to add details to the center of the flower.
- Use a nail stamp to add leaves or other designs to the floral pattern.
- Consider using a nail polish with a built-in top coat to make the process easier.
- Practice makes perfect, so don’t be discouraged if your first attempt at a DIY spring manicure with floral patterns doesn’t turn out perfectly.
Common Mistakes to Avoid
Here are a few common mistakes to avoid when creating a DIY spring manicure with floral patterns:
- Not preparing your nails properly before starting the manicure.
- Not letting the base coat dry completely before applying the polish.
- Not using a dotting tool or nail art brush to add details to the floral pattern.
- Not finishing with a top coat to seal in the polish.
- Not being patient and taking your time when creating the floral pattern.
Conclusion
A DIY spring manicure with floral patterns is a great way to add some color and personality to your nails. With the right tools and techniques, you can achieve a salon-quality finish from the comfort of your own home.
By following the steps outlined in this article, you can create a beautiful and unique DIY spring manicure with floral patterns. Remember to take your time, be patient, and practice makes perfect. With a little practice, you’ll be a pro at creating DIY spring manicures with floral patterns in no time.
Additional Designs
If you want to try something different, here are a few additional designs you can try:
- A simple stripe pattern using pastel shades.
- A geometric pattern using bold colors.
- A nature-inspired design, such as a leaf or a branch.
- A abstract design, using bold colors and unique shapes.
Remember, the possibilities are endless, and with a little creativity, you can create a unique and beautiful DIY spring manicure with floral patterns.
Nail Care Tips
To keep your nails healthy and strong, here are a few nail care tips to follow:
- Keep your nails moisturized by applying a nail oil or cream regularly.
- Avoid using nail polish removers too frequently, as they can dry out your nails.
- Use a nail file to shape your nails, rather than clippers, which can cause damage.
- Avoid biting or picking at your nails, as this can cause damage and lead to infection.
By following these tips, you can keep your nails healthy and strong, and enjoy a beautiful DIY spring manicure with floral patterns for weeks to come.
Final Thoughts
A DIY spring manicure with floral patterns is a great way to add some color and personality to your nails. With the right tools and techniques, you can achieve a salon-quality finish from the comfort of your own home.
Remember to take your time, be patient, and practice makes perfect. With a little practice, you’ll be a pro at creating DIY spring manicures with floral patterns in no time. Happy polishing!


